Thursday, January 26, 2012

Most awesome Pot Roast

What a perfect dinner to cap off my "Slow Cooker Week" Ok so I know its only Thurs but we go to my mother in laws every Fri for dinner so that means its only a 4 night cook week for me. Now You may notice I also haven't blogged any other recipe's this week except 1. Well that being because the first one was nothing really to blog about. Simply throw some chicken in the crock pot and pour BBQ sauce over it and let it sit and cook for a few hours. I prefer to use KC Masterpiece but that's probably just the Kansas City girl in me. :) Tues' dinner I blogged about and last night well I wasn't feeling good so I skipped "cooking" and just did chicken nuggets and fries...... A Good back up plan for when you don't feel well. Haha

So tonight's dinner I wasn't real sure about, I'm not normally much of a roast person and after the somewhat flop of the Stew I was worried that it might not turn out as good as I originally had thought. However I kinda feel like we'll try it once and if we don't like it we won't do that recipe again. I have to say it was SO easy too! I started it in the crockpot around 10am. I mixed the simple ingredients together, then threw in the roast. I left it in till about 2pm on low then I kicked it up to high. Then around 4pm I added some potatoes and carrots. Around 5:30 we were ready to eat and it was DELISH! So far my husband hasn't been really commenting much on the new recipes I've tried. He tells me "Its good babe" but that just means its not nasty! LOL Tonight he was like "This is REALLY good!" So I asked him "So is this recipe a keeper to you?" he was like "YES!" Then I asked him if he would feel like having the left overs on Sat for dinner or should I store it in the freezer for another night next week? He was like "Yes! Sat sounds great!" Hahaha So its a keeper. Now the veggies were add on's to the recipe. My husband also enjoyed having 2 slices of bread open and the meat on top with sauce all over it. I had 1 slice of bread on the side and used it to sop up the extra very thick yummy gravy. Our plates were clean in record time! Eli however took a bite, spite it out and proclaimed "YUCK!" But we have had trouble getting him to eat meat so far at this age. I'm sure as he gets older he'll like it. :)


Hubby's roast on bread and covered in sauce! 

Ok so here's the recipe.... Again taken from allrecipes.com
http://allrecipes.com/recipe/awesome-slow-cooker-pot-roast/detail.aspx

  • 2 (10.75 ounce) cans condensed cream of mushroom soup
  • 1 (1 ounce) package dry onion soup mix
  • 1 1/4 cups water
  • 5 1/2 pounds pot roast

Directions

  1. In a slow cooker, mix cream of mushroom soup, dry onion soup mix and water. Place pot roast in slow cooker and coat with soup mixture.
  2. Cook on High setting for 3 to 4 hours, or on Low setting for 8 to 9 hours.

    I forgot to mention above that the only changes I made to this recipe was that I added some seasoning salt to the roast on both sides before putting it in the crock pot. But again thats optional. Well I guess the whole recipe is optional. Haha Enjoy!

Wednesday, January 25, 2012

Pork Tenderloin

So as I've said this week is slow cooker week in our house, Monday started with an easy to make BBQ Chicken in the slow cooker. Easy because you just add chicken and pour BBQ sauce over it and let it sit for several hours. However last night was Pork Tenderloin, again I've never cooked this but the recipe sounded so good!

This weekend has been a rough one for our family, Fri Casey didn't have work so stayed home. We decided to get him in to see the Dr because he's been sick. Turns out he has bronchitis and I have a sinus infection. Casey has been home ever since till today when he finally went in. Having a sick man in the house is like having another child in the house. Its been exhausting, so yesterday as I prepared the pork tenderloin in the crock pot I wasn't feeling well. As I added ingredients I felt worse because the last 3 added smelled HORRIBLE! They were, Red Wine (a cooking red wine), Soy Sauce and minced garlic. YUCK, as I covered the pot I looked at that expensive dinner and thought "You'd better taste good!" I was worried that it would taste horrible. As it cooked the smell changed and wasn't as horrible, although you could still smell the cooking wine. I think its cause it seems to be mostly vinegar which I hate the smell of.

So finally the 4hrs passed and dinner was ready, now being in a haze the last few days I totally didn't think about what side to go with it till it was done! As I was dishing up dinner I thought at how potatoes and carrots would probably compliment this VERY well. Note to self, instead I steamed up some broccoli. The recipe called for a 2lbs pork tenderloin which is a lot for 2 people to eat. So I put it in a vacuum bag and sealed it up and stuck it in the freezer.... I also put the rest of the sauce in a bowl and stuck it in the freezer for future use. So now if I don't feel good one night I can take those out, stick them in the crock pot for like an hour with potatoes and carrots and viola! I'll have dinner!

Sadly I'm just now realizing I forgot to take pictures of dinner last night! Ha oh well. Again this one came from allrecipes.com
http://allrecipes.com/recipe/amazing-pork-tenderloin-in-the-slow-cooker/detail.aspx


Ingredients

  • 1 (2 pound) pork tenderloin
  • 1 (1 ounce) envelope dry onion soup mix
  • 1 cup water
  • 3/4 cup red wine
  • 3 tablespoons minced garlic
  • 3 tablespoons soy sauce
  • freshly ground black pepper to taste

Directions

  1. Place pork tenderloin in a slow cooker with the contents of the soup packet. Pour water, wine, and soy sauce over the top, turning the pork to coat. Carefully spread garlic over the pork, leaving as much on top of the roast during cooking as possible. Sprinkle with pepper, cover, and cook on low setting for 4 hours. Serve with cooking liquid on the side as au jus.

The recipe says it takes about 15min to prepare and I found it was pretty close. This was very good! I also added some seasoning salt to the mix just to make sure it had lots of flavor. I think maybe if it cooked a little longer it would be falling apart on its own. As it was though it wasn't hard to cut at all. I will be keeping this recipe! :)

Monday, January 23, 2012

Store Adventures

So I have blogged about how I am trying to expand my cooking abilities. I have also blogged that this week is slow cooker week. Where I"m going to cook everything in the slow cooker. Should be easy right? Well that is until its time to shop for some of the ingredients for this weeks meals. So on the menu this week was pork tenderloin and pot roast.... So I found the tenderloin pretty easily, but the recipe also calls for red wine (to cook with). Now I have never bought wine before, so I look in the "beer" section at price chopper and I don't find any "WINE". So I figure I'll skip that and let Casey stop somewhere and get some anyway. Well in another section I find a "Cooking" wine. Which I guess you don't even have to be a certain age to get cause I didn't get carded! LOL Anyway next I had to find a "Pot roast". Harder then I thought.

With the pork tenderloin it said right on it "Pork tenderloin" so it was easy, with the pot roast I was looking for it to actually SAY pot roast. Also their selection was poor, so I finally settle on something that says "ROAST" on it but dang it was $16! Just as I was walking away one of the workers come out with a rack full of meat. He asks if I"m finding everything ok and I finally summon up the courage to tell someone I don't know what the heck I'm doing and what is it I need? He tells me that as long as its a "ROAST" its ok, just some people prefer certain kinds (arm or rump). He also tells me that I have an EXPENSIVE one because its all natural (no growth hormones etc). So finally I get some meat that is much less expensive... There was also a lady there looking at the meat and she overheard and was telling me the best way to cook a roast etc. Was all pretty funny if you ask me. Just another adventure in my learning to cook. :)

Wednesday, January 18, 2012

2-step inside out chicken pot pie= 2 delicious

Today was try a new recipe day again. Normally I'm not much of a veggie eater but what was in today's recipe I actually enjoyed.... All but the red peppers and I didn't mind the taste to much but with a 4mo old that is nursing and has been a very colicky baby I didn't want to risk it with the peppers. I didn't follow the recipe to the letter this time but pretty much.

I started out with 4 chicken breasts.... What I figured to be about a pound of chicken, I cooked the chicken till "brown" which is actually more of a grey like the directions says, the recipe doesn't call for it but I added a little poultry seasoning to the chicken to make sure it had lots of flavour it turned out really well!

After the chicken was cooked I also did another step that the recipe doesn't call for (so I guess I ended up with 4 step inside out chicken pot pie) and that was to cut the chicken up into little chunks. I figured that most chicken pot pie its not full chicken breasts and it would help the chicken cook faster.

Next I added the veggies and soup, for the veggies I got a "Red Roasted potatoes" mix, it has Red potatoes, red peppers, onions (although I never saw any) and broccoli. While it was all simmering I put the biscuits in the oven. It was simple, pretty fast and yet yummy! We even had enough to have some left over, for those of you who don't know my husband very well let me just say he can eat... and eat.... and eat some more. So unless we fixed a HUGE amount of food there isn't normally any left over. Either way this recipe is a keeper!

Everything simmering in the pot... Look at those yummy veggies!

Served up on the hot biscuits! Yummy!

Most of you might be surprised to hear that I said I enjoyed this, broccoli and all but I actually did! I like cooked broccoli I have found out I like it as long as its cooked and in something like this. :)

Next week we will be doing everything in the slow cooker! So stay tuned!

Oh and here is this recipe again taken from allrecipes.com
http://allrecipes.com/recipe/2-step-inside-out-chicken-pot-pie/detail.aspx


Ingredients

  • 1 pound skinless, boneless chicken breast, cut-up
  • 1 (10.75 ounce) can Campbell's® Condensed Cream of Chicken Soup (Regular or 98% Fat Free)
  • 1 (16 ounce) package frozen vegetable combination (broccoli, cauliflower, carrots)
  • 8 hot biscuits, split

Directions

  1. Cook chicken in nonstick skillet until browned, stirring often.
  2. Add soup and vegetables. Cover and simmer until done. Serve on biscuits.

Beef Stew = so so

My first attempt at home made from scratch stew and it was ok but not great. My adventure begins when I was looking for a potato peeler and thought we didn't have one (I later found one). So I decided I would have to use a knife to peel them. Thats what they used to do in the old days right? I chose a knife that wasn't to terribly sharp so as to avoid cutting off an appendage. It was pretty tough having to peel 6 potatoes with a knife but I managed eventually. As I was cutting the fresh peeled potatoes I couldn't help but think about all those TV shows and movies I've seen where the wife/mother/woman of the house is in the kitchen cutting up lots of vegetables for dinner. I've never been THAT kind of wife/mother before. I do fix dinner but well not the big fancy dinners that requires cutting of fresh produce. Or at least not that often, I even hummed a little personal theme song in my head and pictured myself wearing an apron with my hair pulled back in a bun and perfect make up on.... Ok scratch the makeup I can't stand the stuff. In stead I was dressed VERY casual and had my hair thrown into a very messy ponytail. Ah well can't be perfect!

Next up was the celery and carrots. Casey had recently just bought a bag of baby carrots because he had the munchies so me trying to be frugal I decided to just use those instead. I just cut them up a little smaller and there you have the carrots. I added all the produce to bowls to add in the stew when I was ready for them.

The recipe calls for browning the meat on all sides and then browning the boiling onions on both sides before combining everything in the pot. Which is what I did, at this point the house smelled WONDERFUL and I really was feeling VERY domestic! I will say all this "prep" for the simmering takes about an hour so allow plenty of time!

Finally it was time to add everything in the pot for a good long simmer. I learned something, the recipe calls for adding all the veggies and meat BEFORE the broth for a good reason..... It WILL SPLASH! Ok, it wasn't a huge deal really. As I was dumping the veggies from their prospective bowls (green bowl for celery.... orange bowl for carrots) I couldn't help but feel a little like Martha Stewart. "Take this marvelous cut celery and add it to the broth, followed by your marvelous carrots, onions and last but certainly not least your stew meat. Stir it all together and wow doesn't it just smell wonderful?" Haha Yes I was having a grand time. I put it all in and then after it came to a boil I put the lid on, turned down the heat and let it simmer for the 2hrs it called for.

Everything ready for simmering.


Finally it was time to taste the stew, it was ok. It was good enough but nothing special. I think next time I will ad a little more seasoning then the recipe calls for. I think also since my husband wasn't fond of the texture from the potatoes turning to mush I will probably ad those about an hour into the simmering instead of letting them simmer for 2hrs with the whole stew. I have to say other then the meat it was all pretty mushy. The meat however was VERY tender and flavorful just not the rest of the stew.


Finished product with biscuits.

So finally here is the link to the recipe... Again I found it on allrecipes.com You might want to check out the reviews for suggestions. I was just reading them and realized I should have waited to put the potatoes in till around a half hour before the stew is done. Dully noted, on with the recipe...

http://allrecipes.com/recipe/angels-old-fashioned-beef-stew/detail.aspx


Ingredients

  • 4 tablespoons vegetable oil
  • 1/2 cup all-purpose flour
  • 1 tablespoon garlic powder
  • 1 teaspoon salt
  • 1 teaspoon black pepper
  • 2 pounds beef chuck, cubed
  • 12 small boiling onions
  • 6 large potatoes, peeled and diced
  • 6 carrots, sliced
  • 3 stalks celery, sliced
  • 3 (10.5 ounce) cans beef broth
  • 3 tablespoons all-purpose flour
  • 1 tablespoon cold water

Directions

  1. In a large pot heat oil over medium high heat. In a resealable plastic bag mix together the flour, garlic powder, salt and pepper. Add a small handful of meat at a time and shake until well coated; brown in hot oil, about 1 minute per side. Remove the browned meat and continue until all the meat is browned.
  2. Lower heat to medium and add onions. Brown onions on both sides, about 3 minutes per side, then remove from pot and set aside. Drain excess fat from pot.
  3. To pot add potatoes, carrots, celery, reserved onions, browned meat and broth. Stir all together and bring to a boil. Reduce heat to low, cover and simmer for 2 hours, stirring occasionally.
  4. For a thicker broth: 1/2 hour before stew is done, combine 3 tablespoons flour and water in a small bowl and mix well, then slowly stir mixture into stew.

Made from scratch pizza = YUM!

Recently I have been trying to plan our meals about 2 weeks in advanced. Like I said in an earlier blog I have been searching for new recipes to try. This was one I found on allrecipes.com and I do say I think its a keeper.

The adventure began after the kids were down for a nap, this recipe is pretty basic and easy to follow. I did everything as it said but when I got to the part about turning the dough out and kneading in more flower is where I started to get a little concerned. My concern was this, it seemed to be a very THIN dough and I was worried I hadn't done something right as it was VERY VERY sticky. No fear though, I started kneading in the extra flour like the recipe calls for and it began to thicken up. I think I used more flour then the recipe called for though.

At the end I did change up some things, I put it into a metal pizza pan and brushed the dough with melted butter with a brush. Then I cooked the dough for about 5min before adding toppings. It was a VERY thick crust and I wanted to make sure it was baked well enough. After that I took it out of the oven and put on my toppings. Hamburger and lots and lots of cheese! YUMMMM!!! Oh yeah and of course the sauce. I found I only used about half a can of sauce so it might be better to purchase the sauce in a jar instead so you can store it easier.

After adding the toppings I again brushed on extra butter around the crust and then sprinkled garlic salt on the crust. I baked the pizza till it was nice and golden and it tasted wonderful! I think next time I'll use a tad more butter and garlic salt though. It probably would have done 2 smaller pizza's better but this large pizza was still nice and thick. You could probably split it up for a nice thin crispy crust though.

The ready to bake pizza... I also used a shredded Cheddar cheese.


Here is the recipe from allrecipes.com
http://allrecipes.com/recipe/jays-signature-pizza-crust/detail.aspx

Ingredients

  • 2 1/4 teaspoons active dry yeast
  • 1/2 teaspoon brown sugar
  • 1 1/2 cups warm water (110 degrees F/45 degrees C)
  • 1 teaspoon salt
  • 2 tablespoons olive oil
  • 3 1/3 cups all-purpose flour

Directions

  1. In a large bowl, dissolve the yeast and brown sugar in the water, and let sit for 10 minutes.
  2. Stir the salt and oil into the yeast solution. Mix in 2 1/2 cups of the flour.
  3. Turn dough out onto a clean, well floured surface, and knead in more flour until the dough is no longer sticky. Place the dough into a well oiled bowl, and cover with a cloth. Let the dough rise until double; this should take about 1 hour. Punch down the dough, and form a tight ball. Allow the dough to relax for a minute before rolling out. Use for your favorite pizza recipe.
  4. Preheat oven to 425 degrees F (220 degrees C). If you are baking the dough on a pizza stone, you may place your toppings on the dough, and bake immediately. If you are baking your pizza in a pan, lightly oil the pan, and let the dough rise for 15 or 20 minutes before topping and baking it.
  5. Bake pizza in preheated oven, until the cheese and crust are golden brown, about 15 to 20 minutes.


    We ate our the pizza so fast we burned our mouths it was that yummy! I didn't even get a chance to snap a picture before we dove in. Oh well it was a nice looking pizza and twice as good! Happy eating!

Monday, January 16, 2012

Eli turns 1

In my intro post I talked about how I really fell in love with making cakes with Eli's first birthday cake, I did forget to mention I had taken a stab at decorating some basic cakes like a guitar one and even made my little sister a small snoopy cake. But those were pretty easy, Eli's cake though was a lot of work! Here is the process.

I got a wedding cake pan set, now let me say that makes A LOT of cake, we had a good sized party, about 30 people or so and still had tons of cake left over. However as my passion for photography I wanted to have a "smash" cake for Eli to photograph as well. The idea was to have the top be his "smash" cake. Although my son is not a very messy baby so there was little smashing. Anyway, I got the 3 pan set and I made a trial cake several weeks in advanced. I have never worked with fondant and I had heard its hard, but I knew there was no way I was doing butter cream on that big of a cake and getting the desired effect.

The cake was jungle themed, Eli's room is jungle themed and monkey's.... Lots of monkeys, so we wanted to incorporate that into his 1st birthday. I knew I wanted for sure at least a monkey, lion and elephant. I looked up online how to make fondant animals and found several blogs that showed different things. I had my own little style that I added to it. The cake was also going to have palm tree's on it. I saw in a magazine where someone used pretzel rods and gum paste to make the palm tree's. I altered that idea to make my own palm tree's, again the palm tree's I attempted a few weeks ahead of time and boy am I glad I did I learned that you need to form the palm leaves and let them dry before putting them on the rods or they were going to droop bad and not look right. So I went back to researching and found that I should cut the leaves out, and let them dry, to get the desired shape I used markers and laid the leaves over to let them dry overnight creating a curved effect in the leaves I used on the tree's. I also planned on using palm leaves around the cake so I made plenty of cutouts for it. I used a plain leaf cutout and then put cuts in it to make them look like palm leaves.


I let them dry overnight so they became hard, they were still slightly pliable too which helped. Next I took a ball of fresh fondant and placed it on top a pretzel rod to have a way of securing the leaves. Then I layered the leaves around the top of the ball. To attach the leaves I used a paint brush I use for baking and dipped it in water and brushed it on the back of the leaf and pressed it against the ball on top the pretzel. I held it for a few seconds to allow it to secure, then I continued around the whole thing.


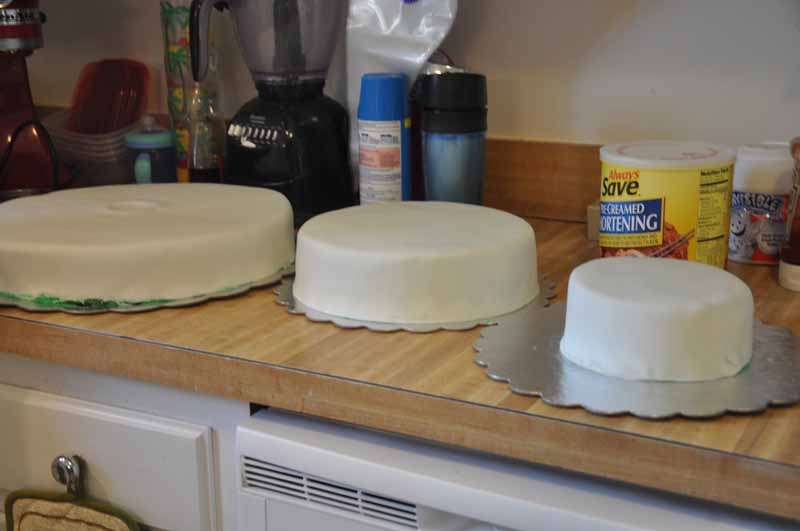
The night before I had baked the cakes so they would be cool and ready for decorating. I cut the tops of the cakes off making them smooth and used a baster brush to brush off as many of the crumbs as possible before dirty icing the cake. I learned this method by watching Cake boss, its a thin layer of butter cream used to fix the fondant to the cake. You let the butter cream set for a few minutes, what I did was dirty ice all the cakes and then by the time I was done with the last one the first one was ready for the fondant.


All the cakes dirty iced and ready for fondant.

Now the thing with fondant is you have to get the cake pretty smooth or it will show through the fondant. Also it can be a pain to roll out and lift over the larger cakes. Something I read to do was to use the rolling pin to lift the fondant over the cake, that really helped with the bigger cake, you can kinda gently roll the fondant over the pin and then unroll it over the cake. I didn't mess with coloring the fondant for the cake as that can take awhile and hard to do with that much fondant. So since the cake was going to be all 1 color I just bought a can of the cake spray paint and used that. It took about a can and a half I think to do the full cake. Make sure you practice on something else BEFORE trying it on your main cake. Again I did a trial run about a week before with just the smallest pan.


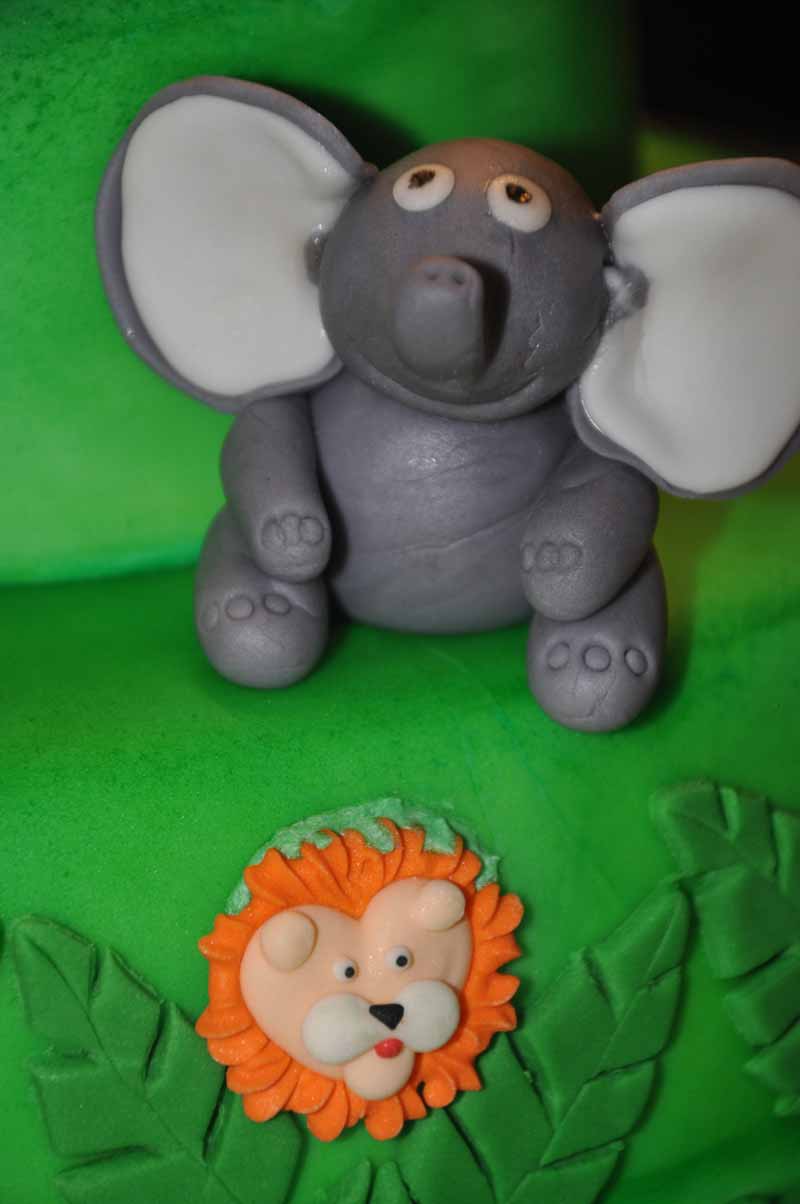
The lion, I had read you can scratch the mane to make it look all fuzzy but I didn't want to mess up such a cute lion so I left it as is. Pretty much just a long "snake" that I wrapped around his head and joined at the chest. Turned out pretty cute!


To make the little toes on the elephant I just took a writer tip and pressed it into the feet. Also thats how I cut the eyes for the animals. I used a writer pipping tip and cut little dots out. The black was just a food marker that I dotted on the eyes after they had dried a little. 

The little faces (like the lion showed here) were bought at a cake shop, they are little sugar candies. I attached them to the side of the cake using a little butter cream frosting.


The finished cake,  The little animals around the bottom are candles my husband placed there just for photographing. The bottom tier of the cake has "grass" around it, I just cut strips of fondant and then cut about 3/4 of the way to make the little blades of grass.


The 2nd tier I used the palm leaves all around. Every other group of leaves I put one of those animal faces to look like they are peeking through the leaves.

The top tier I left blank except where I put "Happy B-day Elias" I made the letters just out of fondant that I rolled and shaped. You can buy little letter cut outs but they were like $20 and we had already gone over our budget for his party.  I think the lettering that I did though actually turned out better because they kinda looked like little tree logs which fit the theme better.

This years cake I'm planning on a Sesame Street cake! Should be fun! Stay tuned!

Intro

While growing up I knew the basics of cooking/baking. However I wasn't really interested in it and my older sister loved it (especially baking). She did most of the cooking/baking in our house. I do remember doing SOME stuff but not a lot. After my parents divorce it came about that I was living with my aunt and uncle who are just a few years older then myself and their children. My aunt did a lot of cooking and showed me the wonder of spices. Something not used in my household much while growing up. When I was out on my own I started experimenting with cooking a little. Not a lot, I did however make up a WONDERFUL meatloaf that everyone who has tasted it just LOVES. When I met Casey and we were first dating I made him dinner one night, I told him I couldn't cook but I told him we were having meat loaf. He cringed, he wasn't a big fan of meat loaf but he didn't say anything. He took one bite of my meatloaf and about died. To this day that is one of his favorite meals.

Once we were engaged his mom who LOVES cooking/baking wanted to make our wedding cake. He assured me that she would do a good job as she is good with cakes. Well things happened beyond her control, I had gone to "help" her with the cake but ended up doing it all myself. Now other then baking a cake in a pan and just using the pre-made frosting in a can I had never done anything fancy with a cake. Yet here I was left to figure out how to stack and frost a wedding cake on my own! Casey's grandmother was there and she used to decorate cakes so she instructed me (she could no longer assist with it). The cake turned out um ok (I hated that cake) and I vowed I would NEVER decorate a cake again. Ha famous last words.

After Eli was born I got hooked on a TV series, Cake boss. I was amazed at what you can do with cake, as Eli's 1st birthday drew close I knew I wanted a certain cake, but I also knew we couldn't afford it. The only way to get this perfect cake that I had in mind was to do it myself. Thus began a love affair with making cakes. His cake was a jungle theme, I wanted everything to be editable. I spent hours researching and looking up idea's on the Internet and then set to work. This is what I ended up with,

In another blog I will blog how I did it.
As time went on I started looking for reasons to play with the whole baking cakes process. I did my aunt's baby shower cake.  I've already got an idea for Eli's 2nd birthday as well as Willa's first birthday cake and she's only 4mo old!

Lately as money has gotten tighter we've decided to try cutting out eating out as much as possible. I normally try to cook at home but I have gotten tired of making the same things I am "comfortable" making for dinner. All it does is rotate over and over, SO I decided to start looking up new recipes and trying new things. Thus this blog was created, for me to blog my successes and failures and to share with people the ones that I just LOVE and maybe inspire a few other "non-cookers" out there. Its not as hard or scary as it seems! You just have to try, and make sure you enjoy yourself.